12:23 AM |
Posted in
Windows uses DNS cache to store recently visited websites. You can see what your computer stores in this cache by going to Start > Run and typing cmd (the command prompt). Now type ipconfig/displaydns. You should see a list of all the website addresses it has stored in the cache. Whenever you go to a website, it has to look up the IP address where that website is located. First it checks to see if it’s in your cache before asking the DNS server over the Internet for the IP address. As you can see, referring to the address when you already have it is going to be faster than if it has to travel over the wires to retrieve it.
The items in the cache do not stay there forever, and are constantly making room for more recent addresses you visited. Increasing the size of the DNS cache will allow for faster web browsing, especially if you frequently view the same websites. Edit some registry values to achieve this.
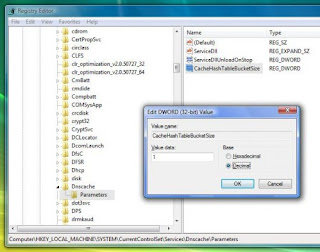
Watch for hexadecimal and decimal values. I have used decimal values in screen shots.
Go to Start
Run and type regedit
Locate this folder
HKEY_LOCAL_MACHINESYSTEMCurrentControlSetServicesDnscacheParameters
Go to New > DWORD (32-bit) Value.
Name it as CacheHashTableBucketSize
Double-click into it and enter the value 1
Add followings also by repeating the method above
CacheHashTableSize = 180
MaxCacheEntryTtlLimit = ff00
MaxSOACacheEntryTtlLimit = 12d
In case of decimal values use:
- CacheHashTableBucketSize, set to 1
- CacheHashTableSize, set tot 384
- MaxCacheEntryTtlLimit, set to 64000
- MaxSOACacheEntryTtlLimit, set to 301
Now exit the registry editor and restart the computer.
11:56 PM |
Posted in
Vista,
Windows Hack
Another unnecessary default setting that Vista (and actually XP as well) comes with is a 20% “reserve” of your available bandwidth in order to accommodate certain applications like Windows Update. This tweak is a pretty common one most old-school users of XP already know – it’s not at all detrimental and you can immediately gain 20% of your bandwidth back, increasing Internet performance significantly.
This is called the QoS Reserve Bandwidth Limit, and to reduce this on any version of Vista you need to edit the registry.
Go to Start and type “regedit“. You may have to deal with the UAC, unless you’ve read Sharninder’s advice on how to speed up your Vista by turning it off! In Regedit, navigate to “HKEY_LOCAL_MACHINE\SOFTWARE\Policies\Microsoft\Windows”
Right-click on Windows and create a new key called “Psched“, then right click on the right and create a new “DWORD” entry. Name it “NonBestEffortLimit” and set the value to zero to disable reserve bandwidth.
��
This is case where the cutting edge technological advances being enabled on Microsoft’s operating system by default is a recipe for disaster for users who have older networks and older network devices (specifically older routers). Vista comes installed and enabled with something called “Receive Window Auto-Tuning.”
On advanced networks, it’s actually a pretty cool technology where the transfer of data is monitored and Vista automatically “tunes” the TCP window field to optimize packet transfer. Older routers simply do not “play nice” when it comes to that kind of window resizing. This spells trouble for home users who don’t know the difference between a packet of data and a packet of sugar. What was Microsoft thinking?
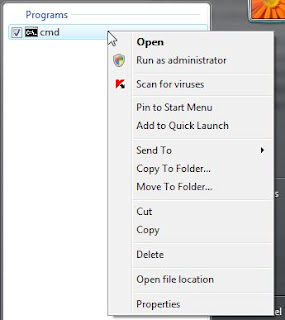
Luckily – there’s a way for you, the home user, to turn this default feature off as well. First, click on “Start” and type “cmd” and right-click on the command icon. You’ll see the following window.
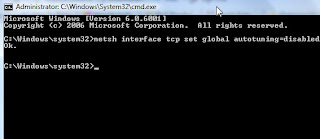
Click on “Run as Administrator.” Then, in the command box, type “netsh interface tcp set global autotuning=disabled” which will disable autotuning.
Now that you’ve got your new Vista finally communicating with your router (hopefully), you’re ready to tweak Vista even more in order to dramatically boost the Internet speed.
Facebook Badge
About Me
- Ranju
- There is one question that evry one has asked themselves at some point of their life & "ho am I...?" I am neither Einstien nor Newton. Neither Brad pitt nor Arnold. Neither sachin nor ricky ponting. Niether vishwanathan nor mike. Neither Binladen nor dawood. Neither jiddane nor ronaldo.......... I am wat I am,A jack of all traits... Hey dont underestimate me by thinking tat I am master in none.... You can e-mail your requests to ranju.m.nair@gmail.com or can comment on posts . Please e-mail me if you know any tips and tricks or stuff like that I will post it with your name in my blog. Thank you for Your Support...
Labels
- Airtel Hack (1)
- Airtel Hack for Free GPRS (1)
- Airtel Hack using Teashark Browser (1)
- Complete Hacking Tools Kit (1)
- Cracking GMail (1)
- EMail Hacking (1)
- flood mail (1)
- Free Mobile Gprs (2)
- Google Hack (1)
- GPRS (1)
- INTERVIEW QUESTIONS (1)
- IP (2)
- Memory card Hacks (1)
- Mobile GPRS Hacks (5)
- Mobile Hacks (1)
- Open Source (GPL) (1)
- Premium Accounts (1)
- Rapidshare (1)
- Regards www.insecure.in (8)
- remove sensitive data from your hard drive (1)
- Sitemeter (1)
- Study Guide (1)
- URL Tricks (1)
- Viruses (1)
- Vista (2)
- Wifi (1)
- Window (1)
- Windows Hack (8)
- Windows Password Cracker (1)